
Getting Started
Deployment- Steps to Minimise or Avoid Downtime When Taking a Website Live
- Automate Permalink Structure with Custom Deployment Script
- Integrating Git for whole site environment
- Create Site (WordPress environment)
- How to clone an existing site on Staq
- How to create a staging site
- How to sync a staging site to production
- How to take a website live (GoLive)
- Go Live with a subdomain
- Switch an existing Staq site to a brand new Staq site
- Customizing Deployment with CLI Commands
- Images broken in Slider Revolution after migration or CDN deployment
- Smart Slider images are broken after taking my website live
- How to migrate a site to Staq
- Do you support Multi-Sites?
- Can I migrate a site to Staq using a third-party plugin?
- How to export a website from Staq to your own hosting environment
- Accessing the Old Website or Server Using the Hosts File
- When a migration fails
- How to create a staging site
- How to sync a staging site to production
- Transitioning Changes from Staging to Live: A Guide to Synced Modifications
- Putting a Live Site back into Dev Mode
Site Management
Backups- Creating Backups
- Restoring a backup
- How to download your backup files
- Why Don’t I See Backups for a Particular Day?
- How our backup system works (comprehensive guide)
- How to setup Client PDF Reports
- Managing Overage Costs and Alerts on Staq
- Organizing Websites with Labels in Staq
- How to Reset Your Password Inside Staq Panel
- How to Bulk Reset Website Credentials
- Resetting Password Inside Staq Doesn’t Work
- One-Click WordPress Login Feature
- Enabling Popups for 1-Click WordPress Access in Supported Browsers
- Enable automatic plugin and theme updates with regression testing and auto rollback
- How to manually update Plugins/Themes faster using Staq Plugin Manager
- How to Deactivate or Delete a Plugin Across Multiple Sites
- Update Plugins/Themes: 1-Click to update everything
- Convert plugins into Global Plugins with a single click
- How to enable Maintenance Mode
- Installing a plugin on multiple websites at once
- How to install or update Plugins/Themes across all sites (globally)
- How to use Global Plugins to manage plugins at scale
- Why some plugins may not automatically update
- My Plugins are not updating inside WordPress
- I cannot access the backend of WordPress
- How to Fix “Briefly Unavailable for Scheduled Maintenance” Issue After Site Update
- Failed to Parse the Package Metadata: How to Fix
- How to diagnose when a Global Plugin isn’t updating across your sites
- Plugin/Theme Update Status via Email Notification
- Troubleshooting “Update Failed: Download Failed” Error
- The uploaded file exceeds the upload_max_filesize directive in php.ini
- Force deactivation of plugin/theme
- How to edit plugins/themes using a file manager editor
- How does regression testing work with Plugin/Theme updates?
- How to install plugin dependencies via Composer?
- Failed to Parse the Package Metadata: How to Fix
- How to setup Bitbucket with Staq (plugin/theme only)
- How to setup Github with Staq (plugin/theme only)
- How to replace “Staq Hosting” plugin inside WordPress with my brand
- Custom SMTP to send automated emails from Staq
Caching & Performance
Caching- Enable/Disable Automatic Cache Clearing
- How to clear the cache for a selected number of pages regularly
- Disable Optimizer tool for certain pages
- How the Staq Cache Preload works
- How to cache a URL with a query string
- Staq Cache – Caching Dynamic Information
- Configure Staq Cache
- How to clear cache of all sites in Staq
- Why Staq cache is the most optimal caching solution to use
- CLI commands for Staq cache
- Disable Staq Cache
- Issues migrating to Staq because of LiteSpeed Cache
- My website design/layout is broken
- How to know when a page is cached and how to diagnose it if it isn’t
- Nonce and Cache TTL
- Fixing “Media Error: Format(s) Not Supported or Source(s) Not Found” on Videos
- How to Speed Up the Backend of WordPress & AJAX requests
- How to Increase PHP Workers
- Cost Optimization Strategies
- Assessing Memory and PHP Worker Resources
- How to Optimize Autoloaded Options in WordPress for Better Performance
- Setup Speed Optimization
- Disable Optimizer tool for certain pages
- Enhancing Core Web Vitals: What web development processes to change
- Elementor: Maximise PageSpeed Insight scores with these settings
- How to Scale a WordPress Website with Staq
Security
Security- How to Change the WP Login URL
- How to enable XML-RPC
- Staq enforces HSTS by default
- SendGrid IP Access Management
- Unblocking WordPress REST API Access
- Enabling 2FA for WordPress Sites
- Staq’s Multi-Layer Security Architecture
- Content Security Policy Error: Causes and Solutions
- Enable Multi-Factor Authentication (MFA) on Staq
- My website uptime monitoring is showing the website is down but it’s up when I check?
- Why was an IP address blocked by Staq Firewall?
- How to ban an IP Address using Staq Firewall
- How Staq Firewall Blocks Bots Attacking Contact Forms
- How to block a country in the firewall
- Cloudflare 520 or 521 error
- How to stop DDoS attacks
- How to configure the Max Login Attempts (Firewall)
- How we block malicious comments submitted by bots
- Staq’s Multi-Layer Security Architecture
- Service Unavailable / 503 Error code and how to fix
- How to whitelist an IP address
- Staq is blocking my SEO tools with 502 or 503 server errors
- How the Staq Firewall system works
SMTP, CDN & DNS
SMTP- How to setup SMTP?
- Installing “WP Mail SMTP Pro”
- How to use Gmail as an SMTP service in WordPress
- Diagnosing SMTP / Email Connection, Receiving Emails
- Override Specific SMTP Global Settings
- SendGrid Integration
- Custom SMTP to send automated emails from Staq
- Increase CDN CloudFront invalidations daily limit
- Images do not show when I’m logged out
- Exclude Paths from Next-Gen CDN Cache
- Staq Next-Gen CDN vs Traditional CDN vs Cloudflare
- How to setup Staq Traditional CDN
- Enable Next-Gen CDN Instructions
- How to disable Cloudflare
- How to stop DDoS attacks
- How to use Cloudflare Proxy with a Staq hosted site
- Integrating Cloudflare with Staq
- How to enable Cloudflare CDN on Staq
- Staq Next-Gen CDN vs Traditional CDN vs Cloudflare
- CDN cache not clearing after changes to plugin/theme
- Is my site loading from AWS CloudFront?
- Staq Next-Gen CDN: One or more CNAME already associated with resource
- CDN issue and how to diagnose and rectify
- ERR_SSL_VERSION_OR_CIPHER_MISMATCH with Cloudflare
- Traditional CDN Failed to Deploy Due to SSL Validation (CAA Error)
- Does Staq sell and manage domain names?
- DNS location and how to add a DNS entry
- Steps to Minimise or Avoid Downtime When Taking a Website Live
- How to Add NS Records for Subdomains on Staq
- DNS is not resolving
- Where you access the A record or NS Record
- How to add Google or Office365 MX records to Staq DNS
- Resolving Localized Issues Caused by Hardcoded IP Addresses in the Hosts File
- TXT record in DNS – CharacterStringTooLong
- How to move the DNS across to Staq when the site is already hosted on Staq
- How to enable instant DNS Propogation
- Switching DNS back to Staq and now the site doesn’t load
- IT company says they want to move DNS away from Staq. What should I say?
Server & Tools
Analytics & Logs- How to track a site’s activity history
- Someone installed/deactivated a plugin. What logs are there?
- Server Logs
- Why Staq Shows More “Human Visitors” Than Google Analytics
- How to check if CRON jobs are working
- How to clear the cache for a selected number of pages regularly
- How to setup a Cron job in Staq
- Resolving the “Missed Schedule” Issue in WordPress
- Access to phpMyAdmin / database
- SQL query to delete entire WooCommerce products in one hit
- Images broken in Slider Revolution after migration or CDN deployment
- How to do a Search & Replace
- Import a third-party SQL database over an existing website
- Running SQL queries inside Staq Panel
- How to use Staq Query Tool to diagnose database queries
- How to download your backup files
- Troubleshooting Import Process Errors in WordPress
- How to Use Staq Debug for Troubleshooting Issues
- How to debug an issue
- My Website is Slow – How to Debug
- Integrating Git for whole site environment
- How to setup Bitbucket with Staq (plugin/theme only)
- How to setup Github with Staq (plugin/theme only)
- Increase Max File Upload limit
- The server cannot process the image
- Increase Max Request Timeout
- Does Staq still support PHP 7.4?
- How to downgrade or upgrade to PHP version
- How to Increase PHP Workers
- Increasing Server Memory
- How to Increase PHP Max Input Vars Limit
- Setup Domain Redirects
- Server Redirects
- SEO 301 Redirect
- How to Handle Regex Redirects with Query Parameters in WordPress
- How to Serve Static HTML Files Alongside Your WordPress Site
- Staq is blocking my SEO tools with 502 or 503 server errors
- Robots.txt file – managing the default file
- Fixing CORS Errors
- 502 Gateway error
- Fixing MIME-Type Errors Preventing Styles and Fonts from Loading
- Service Unavailable / 503 Error code and how to fix
- Server 500 error in browser. How to fix
- 403 Server Error
- Too Many Requests with Error Code 429
- How to fix Access-Control-Allow-Origin issue
- Cloudflare 520 or 521 error
- Troubleshooting Import Process Errors in WordPress
- 504 Gateway Time-out error
- Error 1000 on Cloudflare
- Error 1000 on Cloudflare
- How SSL Certificates Work on Staq
- How to create a custom SSL certificate
- SSL Is Not Generating
- 403 Server Error
- How to add a custom SSL
- ERR_SSL_VERSION_OR_CIPHER_MISMATCH with Cloudflare
- Steps to Minimise or Avoid Downtime When Taking a Website Live
Staq Billing
Staq Billing > Account- Invoice breakdown and viewing excess charges
- How to view invoices (Agency Invoice)
- How to update your credit card (Agency account holder only)
- How to add/update client’s credit card
- How to Resolve “A User with the Specified Email Already Exists” Error
- How to view historical client invoices
- How to create a client and request for credit card details
- Assigning a Client to your agency custom plan
- Amending Your Client’s Details on File
- How to Determine the Reason for a Client’s Payment Failure
- Customise automated emails to your clients
- Adding a custom terms and conditions for your clients (digital agency POV)
- Changing currency when using Staq Billing to charge clients
- Step-by-step instructions in setting up your automated billing to charge your clients hosting fees
Media
Media Media - Diagnose- Images broken in Slider Revolution after migration or CDN deployment
- Images do not show when I’m logged out
- Images or PDFs Showing a “404 Not Found” Error
- How to disable lazyload
Accounts & Billing
Accounts & Billing- Renaming Your Website in Staq
- Canceling an existing site subscription and assigning it to a new user
- Custom SMTP to send automated emails from Staq
- User Access to Staq Platform
- Cost Optimization Strategies
- Changing the timezone throughout the Staq dashboard
- How to see when dev sites will incur charges
- How to unsubscribe or delete or cancel a site in Staq
- Client Transfer
- Does Staq offer annual billing?
- Pricing: How Does Staq Charge?
- Enable Multi-Factor Authentication (MFA) on Staq
- Enabling Popups for 1-Click WordPress Access in Supported Browsers
- Putting a Live Site back into Dev Mode
General
WordPress Hosting- How to enable XML-RPC
- Hosted elsewhere (Site no longer hosted on Staq) Message
- Robots.txt file – managing the default file
- Staq Infrastructure Overview
- How to edit the wp-config.php file on Staq
- Do you support Multi-Sites?
- Do we offer email hosting?
- Is Sage/Roots compatible with Staq?
- Do You Provide Web Hosting to Any Platform or Just WordPress?
- Do You Provide SSH Access?
- Can I run 2 separate WP installs on the same domain?
- My website design/layout is broken
- Website is down
- How to use Staq Query Tool to diagnose database queries
- How to use Query Monitor plugin
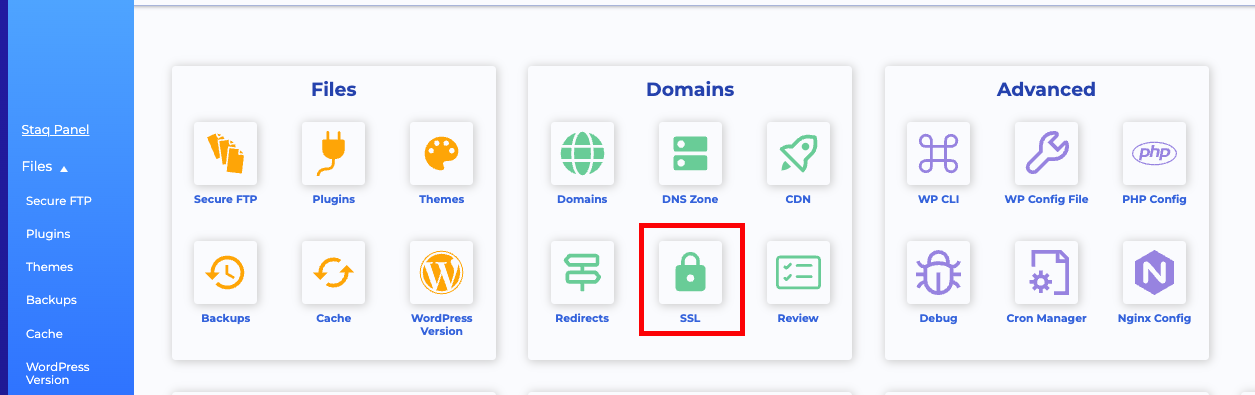
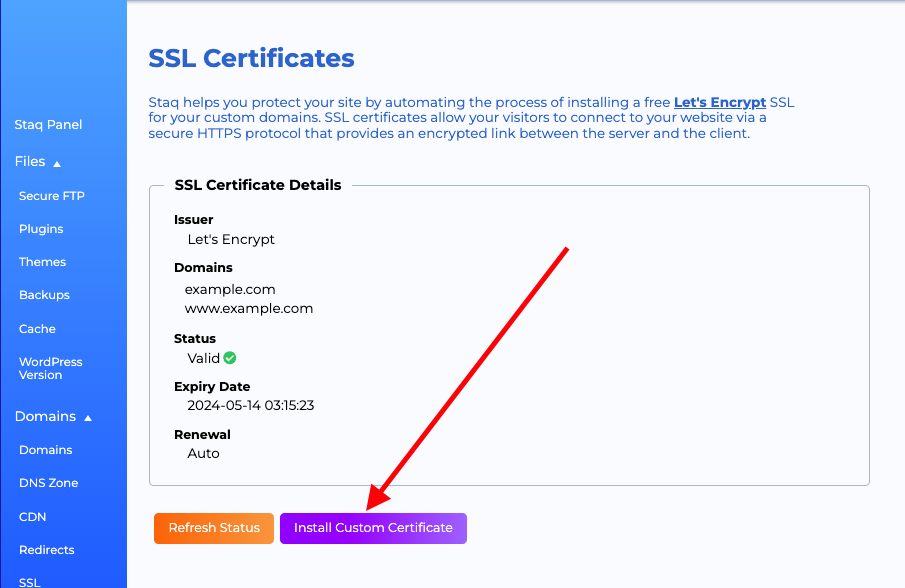
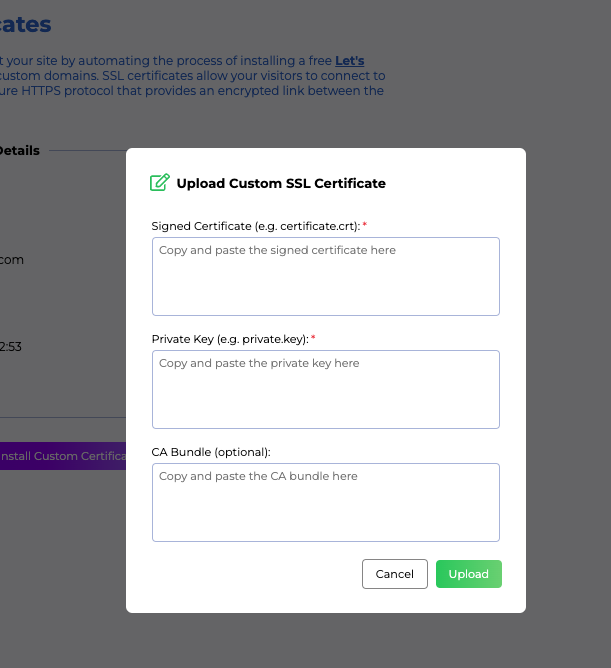
How to add a custom SSL
On this page
Need some help?
We all do sometimes. Please reach out to our support team by dropping us a support ticket. We will respond fast.
