CDN issue and how to diagnose and rectify


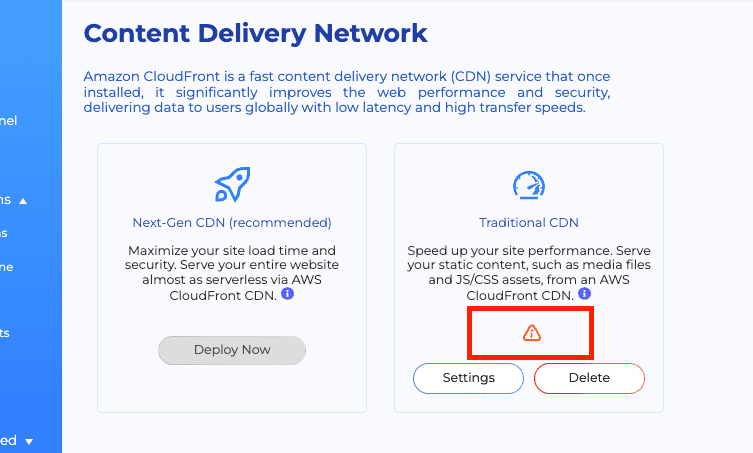
We continuously monitor our services which you can verify via the Websites tab. If the CDN becomes invalid, it will look like this:
When this happens, you can hover over the CDN and you’ll see some of these error message:
- DNS zone is no longer managed by Staq;
- the domain <domain_name.com> no longer points to <unique_code>.cloudfront.net
- the cdn domain does not point to <unique_code>.cloudfront.net
- possible issues found in the domain validation process
- the domain name has expired
Is the site still hosted on Staq?
Firstly, you want to determine that the site is still hosted on Staq if you haven’t touched any DNS records. To do so, go to Domains:
Does the domain names show a warning symbol?
If so, you’ll have to move services back to Staq.
If you see a green tick BUT you’re having issues with Next-Gen CDN, then there’s a possibility someone has moved the NS/DNS records away from Staq. To confirm, follow the steps noted below under Staq Next-Gen CDN.
Checking CDNs
To verify the issue, go to the website’s Staq Panel > CDN:
The website will either use:
- Next-Gen CDN; or
- Traditional CDN
Staq Next-Gen CDN
If there is a warning symbol, it will appear as per the screenshot below:
Typically, under Next-Gen CDN, the type of errors that show are:
- Dns zone is no longer managed by Staq;
- the domain <domain_name.com> no longer points to aaaaaaaaawn.cloudfront.net
This occurs because someone has moved or altered the DNS from Staq to another DNS provider.
To confirm, go to MX Tool Box and type in example.com (do not put https://www.) and select DNS Check:
Then, compare the NS records that appear inside the DNS Zone which is accessible via Staq Panel:
When you compare the NS records inside DNS Zone and MX Tool Box, do the NS records match?
If no, that means the DNS was moved away from Staq. That means that Next-Gen CDN will fail to work soon in the future after the SSL certificate expires.
If the DNS Zone cannot come back to Staq, delete the deployment of Staq Next-Gen CDN and advise the DNS manager to use the A records of the server which is found inside Domains:
Traditional CDN
Typically, under Traditional CDN, the type of errors that show are:
- The cdn domain does not point to aaaaawn.cloudfront.net
- Possible issues found in the domain validation process
The CDN Domain does not point to …
This occurs due to someone has modified the DNS. To confirm, go to MX Tool Box and type in cdn.example.com (do not put https://) and select DNS Lookup:
Does a record show? If not, it has been deleted if it once existed before.
This is the guide to set Staq Traditional CDN.
Possible issues found in the domain validation process
If you see a warning symbol like the screenshot below, this means that either:
- the validation CDN in Step 1 has been deleted
- the second verification process in Step 2 has not been completed.
You have to complete the entire step for the Traditional CDN to work.
Domain name has expired
To confirm, go to the Domains section inside the site’s Staq Panel (Staq dashboard):
Is there a warning symbol with the message, “IP couldn’t be resolved“?
To further investigate, go to a whois domain search such as:
- Australia: https://whois.auda.org.au/
- USA and other countries: https://whois.godaddy.com/
and search for the domain.
Under Domain Status, if it says Expired, then, you’ll have to renew the domain name for the site and DNS to work again.


